So I've been trying to improve two things in parallel - my pencil drawing and skills in the analog world, and my PhotoShop drawing skills in the digital world. I've done a few drawings in PhotoShop based on either scanning line art and then re-drawing cleaner lines using the Pen Tool, or by drawing from scratch in PhotoShop using the Pen Tool. So far, I've had mixed results, mostly due to the fact that I have a lot to learn and improve upon.
Since I don't have a drawing tablet, when I draw in PhotoShop I'm using the mouse, which presents two obstacles. First, I'm left-handed, but have always used the mouse with my right hand. Trying to do anything with a mouse in my left hand is futile, but when I draw with pencil, I draw left-handed. Second, with the mouse I don't get the natural pencil stroke effect, so all my lines are pretty boring, unless I use various brushes to shape them.
What I've really been after is a good way to scan in my drawings and then use the original line art in PhotoShop, and last night I discovered a way to do this. After browsing quite a few tutorials on separating line art to its own layer, I was able to piece together a technique that got me decent results. The line art was just a simple skull that I drew a few weeks ago, and not a very good drawing at all, but it served the purpose of working through a tutorial and getting fairly clean line art onto its own layer, which could then be colored.
First, I used Levels to blow out the background and darken the lines. Then I loaded the alpha channel as a selection and inverted, so that I had just the lines selected. Then I copied the layer to a new layer and filled the line art with black. After deleting the original layer, I now had the line art on a transparent layer, and could create new layers underneath for coloring.
I also learned that you can lock the transparency on the line art layer, which enables you to color the actual line art while preserving the overall integrity of the lines. However, I was happy to keep my lines black. I spent a few hours playing with this and coloring two sketches, and was quite excited to be able to do this.
I need to refine the process of cleaning up the line art - one of my drawings was scanned from a sketch pad, and the paper texture was difficult to remove from the background. Also, I realized that for scanning purposes, I should not shade my sketches before scanning. I still need to learn more about shading and I'm thinking I should draw, scan, then shade and scan again, or else learn how to shade in PhotoShop.
Overall, this is an encouraging step in my learning process, and is motivating me to continue with pencil drawings, improving my line work, and also using ink to draw over pencil to get better lines for scanning.
Here is the first sketch I practiced on. I cleaned up a lot of stray pixels, but you can see some remnants of smudging in the mouth. Also, the lines aren't very clean. But I was more interested in the process of separating the line art and then coloring it:
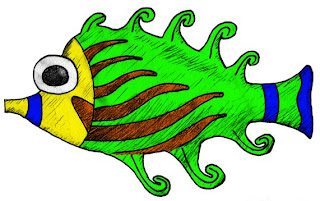
Here is the second drawing I practiced on. This one is a drawing of a fish statuette that was in a hotel room I recently occupied. The coloring took much longer on this one, but was fun to do. And I was actually surprised at how much better it looked once it was colored. Still, there are sloppy lines and remnants of the paper texture in the background around the outside edges of the drawing. This was originally drawn in pencil, then the lines re-drawn in black ink.
A technique I used for identifying stray pixels, smudges, places where I colored outside the lines - I created a background of a contrasting color - in this case red - which helped me see my mistakes much more easily. I used a combination of the eraser tool and layer masks to clean up the coloring: